2011
03.06

If you have the need for a TFTP server in Linux for either backing up and restoring Cisco configs or for PXE boot clients the one I like to use is tftpd-hpa. It’s easy to install and configure as detailed below:

INSTALL:
sudo apt-get install tftpd-hpa

CONFIGURE:
sudo nano /etc/default/tftpd-hpa

#/etc/default/tftpd-hpa
TFTP_USERNAME="user"
TFTP_DIRECTORY="/home/user/tftp/"
TFTP_ADDRESS="0.0.0.0:69"
TFTP_OPTIONS="--secure --create"

The ‘secure’ switch lets tftpd use only the directory specified while the ‘create’ switch allows creating new files without having to touch them first.

2011
03.06

It’s always good policy to backup all your files and databases whether you are running updates or making system changes, or simply just want a backup for safekeeping.

BACKUP:
mysqldump -v -u [username] -p [database_name] > [backup_filename.sql]

RESTORE:
mysql -v -u [username] -p [database_name] < [restore_filename.sql]

The -p switch will prompt you for you MySQL password. In case you have forgotten your MySQL password like I did, you can see my previous post for instructions on how to reset your MYSQL password.

2011
03.06

In order to backup your WordPress webserver you need to backup both the wordpress media content directory as well as the WordPress MySQL database. Unfortunately somehow I managed to forget my MySQL root password, luckily  however I was able to find instructions on how to bypass the MySQL database login authentication and reset MySQL’s root password.

RESET MYSQL ROOT PASSWORD

Stop mysql services:
sudo /etc/init.d/mysql stop

Start mysql in safe mode and skip user authentication:
sudo mysqld_safe --skip-grant-tables &

Login to mysql as root:
mysql -u root

Set a new password:
UPDATE mysql.user SET Password=PASSWORD('new_password_here') WHERE User='root';

When you modify the grant tables manually you need to run:
flush privileges;

Restart the mysql services:
sudo /etc/init.d/mysql start

The FLUSH PRIVILEGES statement tells the server to reload the grant tables.

2011
03.03

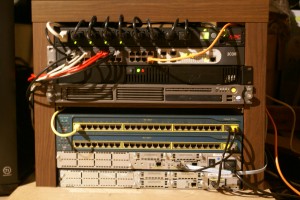
Whilst researching the best rack to get for my home computer lab, I was overwhelmed with the choice of all the different brands makes and models available. Initially I was inclined towards getting a Skeletek Rack, but the more I researched the more I wanted something bigger and better with lockable doors; then integrated cable management became a requirement and shortly afterwards noise cancelling become a necessity too. By the time I had finished my research the rack I wanted to buy would’ve cost me over a grand. -That’s more than the combined total of all the hardware I own.

I realised it was time for a reality check and that’s when I stumbled across this:
The Ikea LackRack

Ikea of all places had the perfect solution to fit my budget. As it turns out one of the tables in Ikea’s furniture range, specifically the ‘Lack’ furniture range, just so happens to be a perfect fit for your standard 19″ rack mount servers/routers/switches/misc IT equipment with no modifications necessary. It seemed almost too good to be true, my new rack cost me a whole £30. RESULT!

2011
02.27

It’s always a good idea to display legal disclaimers and banners at login of any publicly accessable servers/routers. While it may or may not deter any would be intruders it will certainly improve your chances of prosecution in court should you ever find yourself in that position.

CISCO LOGIN BANNER
configure terminal
banner motd

LINUX – VIRTUAL CONSOLE BANNER
sudo nano /etc/issue

LINUX – SSH LOGIN BANNER
sudo nano /etc/motd

Under Ubuntu Linux it might be necessary to remove the symbolic link from /etc/motd -> /var/run/motd and link a new motd file to /etc/motd

2011
02.27

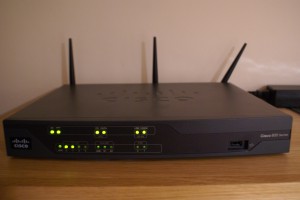
I recently setup a new Cisco 887W wireless router which caused me some initial confusion when I got to the wireless config stages. Unlike the Cisco 877W’s I have setup in the past the newer 887W is setup slightly differently. It’s best to think of the Cisco 887W as two routers inside one box, with a hidden ethernet cable linking them. The normal router and the wireless router are completely separate and they both have their own IOS.

To configure the wireless AP part of the router you need to first login to normal wired router IOS and then connect to the wireless AP IOS with the following command:

service-module wlan-ap0 session

Cisco 880 series product overview.pdf

2011
02.27

Netcat

I wanted to write a quick entry about netcat and some of the things I have used it for, but after sitting down and getting started I quickly realised that netcat is one of those commands that deserves more that just a few lines.

WHAT IS NETCAT?
Netcat is a cli based tool that allows reading from and writing network connections via either TCP or UDP. It’s almost the same as a telnet client, but much more scriptable. Netcat has three main modes of functionality which are: connect mode, listen mode, and tunnel mode.

In 2000, according to www.insecure.org, Netcat was voted the second most functional network security tool and is described as “a TCP/IP Swiss army knife” -An impressive feat when you consider that it is just a single binary file which takes up less than 30KB on a standard Ubuntu install. I am a big fan of small, simple applications which do one job and do it very well as opposed to large bloated software packages. I believe it is for this reason netcat is so popular.

Listed below are a few examples demonstrating the functionality and versatility of netcat.

PORTSCANNER
nc -vz localhost 1-1023 2>&1 | grep succeeded

“2>&1” is because we want to redirect stderr (2) and stdout (1) to a file for manipulation by grep in this instance.

CHAT SERVER
Start the session on one machine:
nc -l 1234

Connect to the session from another machine:
nc 111.222.111.222 1234

You have now started a chat session, simply start typing your message and when you hit the return key your message will appear on the other machine.

TELNET SERVER
Nectat can also be used to set up a telnet server. You can specify bash or  indeed any executable you want netcat to run at a successful connection with the -e parameter:

nc -l 1234 -e /bin/bash

FILE TRANSFER
Start by using nc to listen on a specific port, with output captured into a file:
nc -l 1234 > sending.file

Using a second machine, connect to the listening nc process, feeding it the file which is to be transferred:
nc host.example.com 1234 < receiving.file

WEBSERVER
Usually whilst mucking around with my apache configs this is the script I like to run to display a simple “This page is currently offline for maintenance” page after stopping the apache services of course.

while true; do sudo nc -l 80 < /path/to/down_for_maintenance.html; done

PROXYING
If you want to redirect your website using netcat to another page entirely you can do so using the following commands:

First you will need to create a named pipe to allow inter-process communication:
mkfifo redirect

Then redirect your webserver using the following command:
while true; do sudo nc -l 80 0<redirect | nc www.backuphomecomputerlab.com 80 1>redirect; done

COPY A HARD DRIVE PARTITION TO AN IMAGE FILE ACROSS THE NETWORK
Run this command on the machine where you would like to save the image to:
nc -l -p 1234 | dd of=/path/to/save/image.iso

Run this command on the machine whose hard drive you would like to image:
dd if=/dev/sda | nc 111.222.111.222 1234
2011
02.24

Today I ran into some problems with a corrupted disk image I was trying to restore to a laptop at work. I decided to implement MD5 checksums against my image repository to avoid any future issues.  MD5 (Message-Digest algorithm 5) is a widely used cryptographic hash function with a 128-bit hash value. It is still commonly used to check file integrity but was originally employed in a wide variety of security applications although now is considered cryptographically broken and unsuitable for further security functions after serious flaws were discovered.

To generate a MD5 checksum:
md5sum filename > filename.md5

To verify a MD5 checksum:
md5sum -c filename.md5

2011
02.23

Having just recently returned from holidays with a ton of photos to sort through and upload/email to friends and family I didn’t want to also spend hours uploading huge 10 megapixel photos at roughly 5MB each.

Mogrify is a powerful image manipulation tool which comes as part of the ImageMagick bundle. It allows you do a whole host of image enhancements and modifications including brightness, contrast and sharpness tweaks, converting to black and white, as well as converting image formats and even adding signatues, borders and waterstamps. Because mogrify is cli based it is easy to perform bulk image modifications of entire directories and can even be used in scripts to perform all of these enhancements at once.

Here is the command I used to resize my holiday snaps:
mogrify -resize 40% ~/Holiday_Photos/*.JPG

As an example I was able to reduce a 5MB @ 3872×2592 photo to under 1MB @ 1549×1049

If you would also like to add a signature to your photos you can do so with the following command:
mogrify -font /usr/share/fonts/truetype/msttcorefonts/arial.ttf -pointsize 42 -verbose -gravity SouthEast -draw 'fill black text 20,20 "www.homecomputerlab.com" fill white text 21,21 "www.homecomputerlab.com"' *.JPG


2011
02.23

In order to enable clean URL’s in worpress by altering permalink settings, apache webserver needs to be configured to allow URL rewrites.

First load the URL rewrite module in apache with the following command.
sudo a2enmod rewrite

Once you have enabled the URL rewrite module in apache, you will then need to configure the URL ReWriteEngine either by using an .htaccess file or simply by inserting the necessary directives in a <Directory> section in your main configuration file. Adding the config directly into your apache webserver configuration file will result in less of a performance hit, as the config is loaded once when apache starts rather than every time a file is requested.
<Directory /path/to/wordpress>
RewriteEngine On
ReWriteBase /path/to/wordpress
RewriteCond %{REQUEST_FILENAME} !-f
RewriteCond %{REQUEST_FILENAME} !-d
RewriteRule . /index.php [L]
</Directory>

Finally reload your apache configuration with the following command.

sudo apachectl restart

You should now be able to alter your worpress permalink settings from the wordpress admin page.