2011
12.08
After I got my (new) 2nd ADSL line installed, I noticed my Cisco 877 Router would constantly drop it’s internet connection and often not be able to reconnect to the internet again for extended periods of time. I plugged in the cheap generic router originally shipped by my provider to troubleshoot the problem and sure enough the connection came up first time and stayed up for a full day and a half before I was satisfied that the problem was definitely an issue with my Cisco Router.
My first port of call was to run a debug on the router to try and narrow down the issue:
Don’t forget the ‘temrinal monitor’ command if you are running your debug from a remote session
debug atm events
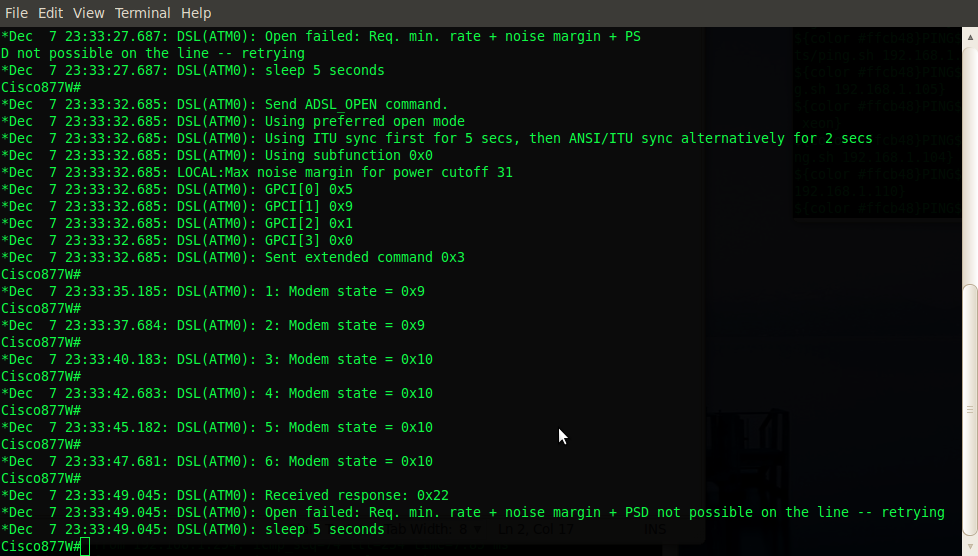
After a quick google search of the error I was receiving and a speed read through the Cisco website the problem seemed to be an issue with the Alcatel DSL Chipset and the recommended resolution, a quick firmware update for the chipset, not to be confused with an IOS upgrade. To get my current DSL chipset firmware version I needed to issue the following command which confirmed my suspicions of the out of date firmware.
show dsl int ATM 0
It was then just a simple matter of downloading the new updated firmware file from the Cisco website ftp://ftp.cisco.com/pub/access/800/ and copying the adsl_alc_20190.bin file to my router.
copy tftp: flash:
reload
The result? My connection is now rock solid and I’m currently sitting on ~2Weeks uptime – not too shabby for an ADSL circuit! I also noticed that my connection syncs are slightly higher than before, so overall a win win and probably a good idea to update your chipset firmware whether you’re connection is dropping out of not, if anything for the higher sync rates.
2011
12.06
 Since I’m constantly moving large files around my network which seem to take forever on my ancient Laptop that only supports wireless b/g, I decided to invest in an Edimax EN-7811Un Wireless N adapter to take advantage of my Wireless N capable Cisco887W Router. Unfortunately however, I quickly discovered that Ubuntu 10.04 does not natively support the Edimax wireless device even running the latest 10.04 Kernel 2.6.32-36 (as of 05-12-2011) and I would need to manually install the Linux driver myself.
The first thing you will need to do, is identify your current built-in wireless device (if any):
lspci -k (Take note of the module being used)
There is an excellent guide located here which you can use to help identify your hardware and corresponding driver modules if you need help:
http://www.cyberciti.biz/tips/linux-find-supported-pci-hardware-drivers.html
Then you will need to disable/blacklist the module from being loaded:
sudo nano /etc/modprobe.d/blacklist.conf

#Blacklist built in wifi

blacklist ipw2200 (module name)
Then install the drivers:
sudo apt-get install build-essential

cd to extracted drivers directory

make

sudo make install

sudo modprobe 8192cu
Whenever an updated kernel is installed, you will need to rebuild the driver module again from source for the new kernel.
cd to extracted drivers directory

make clean

make

sudo make install

sudo modprobe 8192cu
2011
12.06
Category:
Linux /
Tags: no tag /
I had an issue today with a Linux box we shipped to an international office that uses a separate domain name to our Head Office. We enabled zone transfers on the local DNS servers in order to give access to the required services, however we still needed to tell the Linux box which domain names to append whilst performing the name lookups and once that was done we needed to write protect the /etc/resolv.conf file so that the changes would not be overwritten after the next reboot. The necessary config options were as follows:
- domain – The local domain name
- search – The domains to search (domain suffix to append)
- nameserver – The name lookup servers to use
cat /etc/resolv.conf
domain localdomain.com

search localdomain.com

search seconddomain.com

nameserver 192.168.0.254

nameserver 192.168.0.253

nameserver 4.2.2.2
Once all changes have been made and you would like to write protect the /etc/resolv.conf file from any changes being made, you can do so with the following command:
sudo chattr +i /etc/resolv.conf
To remove the write protection, the command is as follows:
sudo chattr -i /etc/resolv.conf
2011
11.23
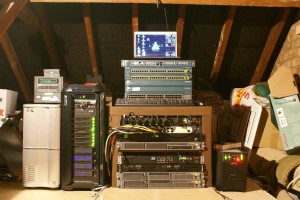
I recently had a 2nd internet line installed at home for my homecomputerlab which I am quite excited about because it means I can finally start working on a few projects I’ve been wanting to do for a while.
Although I will be unable to offer any meaningful kind of SLA’s, I should hopefully be able to start doing some proper web hosting for a few friends I have spoken to in the past and also hopefully a charity or two; my Grandmother runs an animal rescue shelter in South Africa!
The other thing I’d like to do is get my postfix email server back online, although I will probably end up doing a fresh install. I get embarrassed sometimes giving out a @hotmail address. I guess it could be worse, it could be an @aol account :)
Besides that, theres a few routing protocols I’d like to play with as well as configure a site to site VPN from a static ip address to a dynamic ip address, now that I finally have a static IP!
Here’s is the latest pic of the homecomputerlab which has grown somewhat since my last post.
2011
11.23
Category:
Linux /
Tags: no tag /
I have become complacent using Ubuntu/Debian as my main OS on my primary Workstation. So mainly for that reason, but also the fact that Unity, while I can see the potential and the benefits of it for devices like netbooks, tablets and touch screen devices, it’s just not working for me as my primary Desktop Environment. I will be P2V’ing my current laptop config for just in case and installing Fedora Core 16 from scratch to give it a go. It was a toss up between Suse and Fedora. On the one hand I noticed that ESXi 5 is based on Suse so was initially inclined towards installing Suse, but a few friends and peers convinced me to give Fedora ago and as they have just released FC16 I decided I’d be giving that a go instead.
Below is a screenshot of my current Ubuntu 10.04 desktop which I will be overhauling over the next few days/week ends.

2011
11.22
Category:
ADSL /
Tags: no tag /
Last week on Friday the 18th November I had a visit from BT to install a 2nd line into my home/loft/mancave for the homecomputerlab. It turned out to be a tricky install for the engineers after running into a number of problems including: insufficient line plant, previous cable routes/runs being paved over, an old telephone poll last checked prior to 1998, hoist availability, good old health and safety regulations and of course the fact that is was late on a Friday afternoon. But I was determined to get my new line installed for the weekend. After a few rounds of tea and a bribe of lunch from the local kebab shop for the engineer who had initially turned up on site, ‘a few phone calls were made’ and I soon had half of BT descend upon my flat to get my line installed! There was one engineer down a manhole in the road, another engineer at the local exchange/junction box, one up in the loft installing the actual socket and another engineer with a crane/hoist provisioning a new line from the telephone pole. Things were happening fast and my opinion of BT was forever changed! I just hope I never have to call for support but that’s a different story! Needless to say my new line was installed in record time for a Friday afternoon and ready to rock for the weekend.
Initial tests show 16MB down and 1.5MB up

2011
04.19
Category:
Linux /
Tags: no tag /
I feel a little guilty for not posting anything for a while so today’s hot tip is how to ping an entire subnet. Comes in handy when documentation isn’t properly up to date; looking for a certain server/service on a network or when you are working on an unfamiliar network and want to get a quick idea of what is running where. Of course nmap is a lot more powerful than this, but that is a topic for a later, much longer post.
For a quick summary of whats on a subnet:
nmap -sP 192.168.0.0/24
Starting Nmap 5.00 ( http://nmap.org ) at 2011-04-19 23:33 BST
Host AP7920 (192.168.0.95) is up (0.0091s latency).
Host fitpc (192.168.0.100) is up (0.0018s latency).
Host 192.168.0.244 is up (0.018s latency).
Host netbotz200 (192.168.0.251) is up (0.0094s latency).
Host 3com2924 (192.168.0.252) is up (0.0063s latency).
Host cisco887w (192.168.0.254) is up (0.0053s latency).
Nmap done: 256 IP addresses (6 hosts up) scanned in 7.71 seconds
For more detailed info of whats on a subnet:
nmap 192.168.0.0/24
Interesting ports on AP7920 (192.168.0.95):
Not shown: 998 closed ports
PORT STATE SERVICE
22/tcp open ssh
80/tcp open http
Interesting ports on fitpc (192.168.0.100):
Not shown: 996 closed ports
PORT STATE SERVICE
22/tcp open ssh
80/tcp open http
139/tcp open netbios-ssn
445/tcp open microsoft-ds
Interesting ports on 192.168.0.244:
Not shown: 998 closed ports
PORT STATE SERVICE
22/tcp open ssh
80/tcp open http
Interesting ports on netbotz200 (192.168.0.251):
Not shown: 998 closed ports
PORT STATE SERVICE
22/tcp open ssh
80/tcp open http
Interesting ports on 3com2924 (192.168.0.252):
Not shown: 997 closed ports
PORT STATE SERVICE
7/tcp open echo
80/tcp open http
443/tcp open https
Interesting ports on cisco887w (192.168.0.254):
Not shown: 999 closed ports
PORT STATE SERVICE
22/tcp open ssh
Nmap done: 257 IP addresses (6 hosts up) scanned in 76.71 seconds
2011
03.14
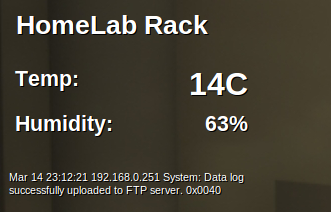
After racking up my new APC Netbotz appliance this weekend and setting up the obligatory snmp, syslog and email alerts, I also wanted to be able to monitor and view my computer lab’s environmental temperatures in realtime on my desktop, without the need to manually login and check web portals or system logs every time. No problem I thought; I would just pipe the output of the syslog file into a regular expression editor, extract the info I was after and finish by outputting the results into conky to display all nice and neat on my desktop.
Without going into too much detail about how the Netbotz appliance works, it turned out that retrieving the information I was after by leveraging the already existing Netbotz logging facilities in order to monitor my homecomputerlab environment with the relevant stats embedded on my laptop’s desktop in realtime was not going to be as straight forward as I had first hoped. I was going to have to write my own scripts to achieve what I wanted.
Below is a screenshot of the end result and the scripts I wrote to achieve this.
#Expect_telnet_login.sh
#!/usr/bin/expect -f

log_file -noappend /home/tyrell/APC.temp

spawn telnet 192.168.0.251

expect "User Name :"

send "username\r"

expect "Password:"

send "password\r"

send "1\r"

send "1\r"

send "1\r"

expect {*#}

close
#APC_temp_humidity_last_syslog_msg.sh
#!/bin/bash

/home/tyrell/scripts/Netbotz_temp/Expect_telnet_login.sh > /dev/null

grep "homecomputerlab rack" /home/tyrell/APC.temp | awk '{print $3}'

grep "homecomputerlab rack" /home/tyrell/APC.temp | awk '{print $4}' | cut -c1-3

ssh tyrell@syslogserver tail -n 1 /home/apc/netbotz/netbotz.log | fold -w47
2011
03.09
Just a quick post about my new APC Netbotz 200 Environmental monitor which turned up today. As I’m sure you’re probably already aware, I host my own computer lab in my loft at home which is uninsulated. As a result the equipment can be subject to very extreme temperatures during the different months of the year depending on what season we’re in. During summer, temperatures can easily exceed 40C in the loft and usually hover around the mid 30’s, while during winter on the other hand temperatures can reach as low as 2C in the loft but usually hover just below the 10C mark. It’s should become clear why an environmental monitor becomes necessary in this type of an environment and the return on investment it offers.
Product Highlights Include:
- Access monitoring: Detect access by unauthorized personnel via door switch.
- Environmental Monitoring: Prevent equipment failure from a full range of threatening environmental conditions.
- Fault notification: Real-time event notification minimizes response times to critical physical infrastructure situations. Enables IT Administrators to reduce mean time to repair, improve efficiency, and maximize uptime.
2011
03.08
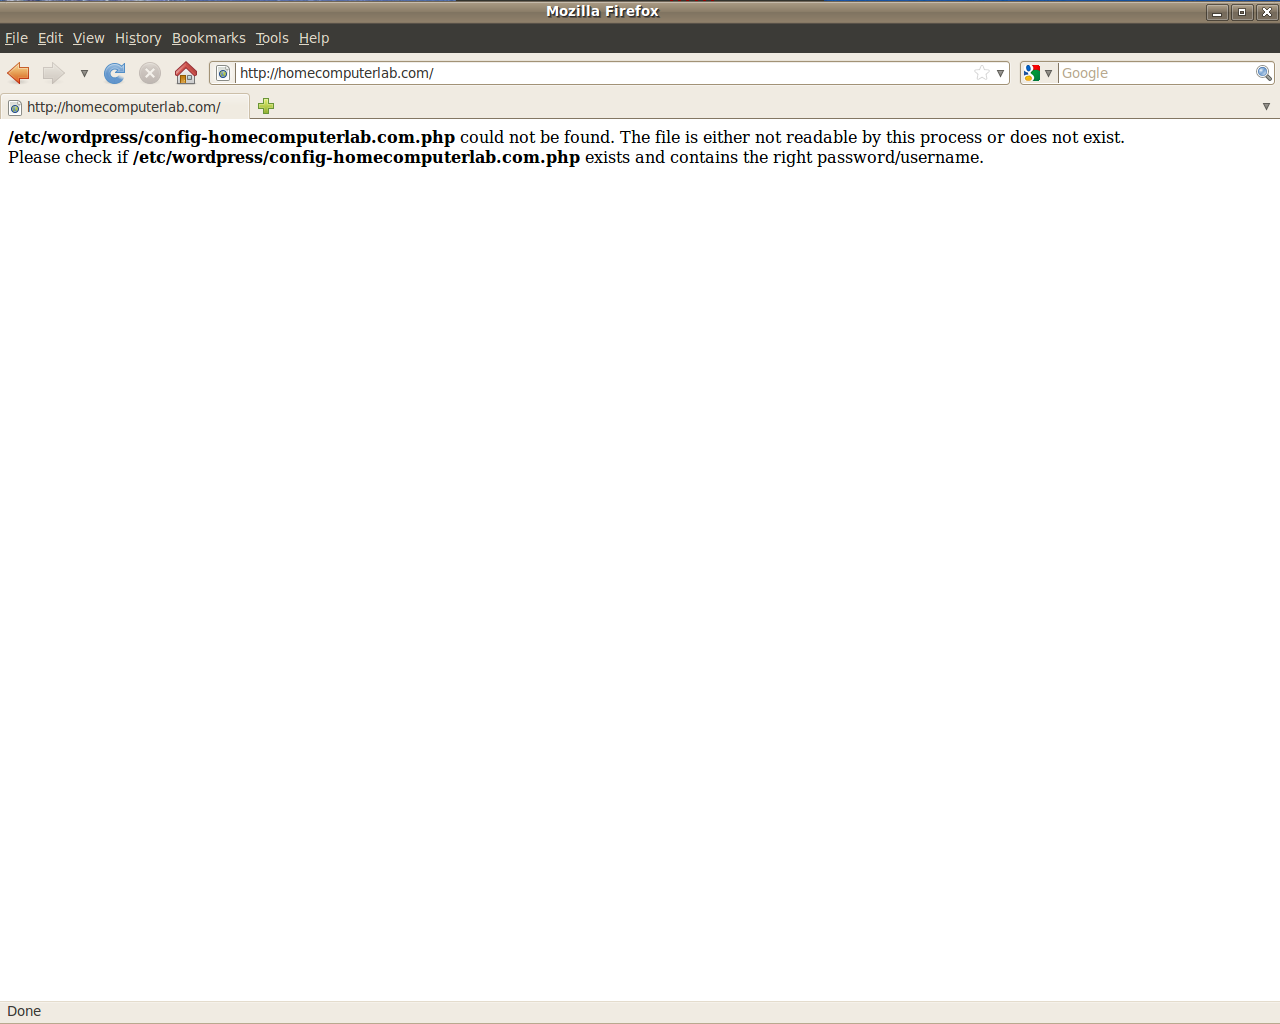
Today I suffered the embarrassment of referring a friend of mine to my (this) website, only for him to reply: “Dude your site is offline, it has an error!” As it turns out the site was in fact OK and reachable, but rather the issue was that I hadn’t configured Apache to redirect requests for homecomputerlab.com to resolve to www.homecomputerlab.com
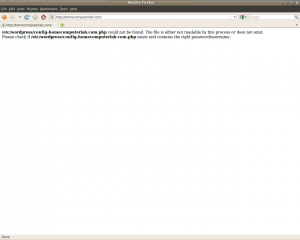
As a temporary fix I simply created the following symbolic link which did the trick and resolved the issue:
sudo ln -s /etc/wordpress/config-www.homecomputerlab.com.php /etc/wordpress/config-homecomputerlab.com.php
After speaking to our in house Senior Web Developer, regarding best practices on how to circumvent this issue, he referred me back towards the Apache rewrite module which I’ve worked with and written about in past here.
Below is his email response which I couldn’t have explained better myself so I’ve posted it unedited here:
There is a better way so you don’t need to explicitly define the site, it users an apache variable like {HTTP_??}, also the rewrite rule should use {HTTP_HOST} to cater for https connections, I never needed to expand it so left it as it is here…
# force www
RewriteCond %{HTTP_HOST} ^([a-z.]+)?homecomputerlab\.com$ [NC]
RewriteCond %{HTTP_HOST} !^www\. [NC]
RewriteRule ^(.*)$ http://www\.homecomputerlab\.com%{REQUEST_URI} [L,R=301]
To explain it a little
- RewriteCond means the following condition must be met, the conditions need to be met to process the next ‘RewriteRule’, otherwise it’ll skip over it.
- We are looking for the alias before the hostname (NC is non case check)
- Then we check if the part before the hostname is not equal to ‘www’
- Then we redirect the user to the same address with ‘www’, L means last rule and R=301 means permanently moved to this address
- Remember with the last rule sequence, you are sending the user to another url on your site, when they request this new url they will re-run the rule set picking up further rules after this rule should you wish to add anything after this.
– Kevin.