2012
03.17
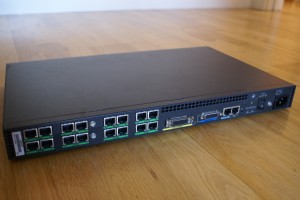
I recently purchased a new piece of kit for the homecomputerlab, specifically a Cisco 2511-RJ router. Although these routers are now discontinued, they do however still come up on ebay from time to time and are the perfect router to setup and configure as a remote access terminal server due to having 16 asynchronous serial ports on board.


What this essentially means is that you can manage up to 16 Cisco devices from a single access server. The only difference is that the ‘serial cable’ in this case has ethernet RJ45 plugs at both ends and one end goes into the console port of the router/switch/firewall you’d like to manage as always, and the other end instead of terminating into a serial port on your pc, goes into an asynchronous port on the access server.
The ‘serial cables’ that are used with Cisco access servers are called rollover cables and they are just standard ethernet cables but with a reversed pin out arrangement. I made my own from some standard Cisco console patch cables as I had plenty of these lying around with just a crimping tool and some RJ45 connectors as you can see in the picture below.

Once you have everything plugged in and connected, from here it is just a simple case of setting up the correct config using the reverse telnet principle.
Current configuration:

!

version 11.2

no service password-encryption

no service udp-small-servers

no service tcp-small-servers

!

hostname Cisco2511-RJ

!

enable secret iddkd

!

username cisco privilege 0 password 0 cisco

ip host Cisco2950T1 2001 10.10.10.10

ip host Cisco2950T2 2002 10.10.10.10

ip host Cisco1760 2003 10.10.10.10

ip host Cisco2621 2004 10.10.10.10

ip host Cisco3550 2005 10.10.10.10

ip host CiscoPIX-515E 2006 10.10.10.10

ip host Cisco877W 2007 10.10.10.10

!

interface Loopback0

ip address 10.10.10.10 255.255.255.255

!

interface Ethernet0

description *** LINK TO HOMECOMPUTERLAB SWITCH #2 - 3COM 2924 (PORT 24) ***

ip address 192.168.1.200 255.255.255.0

!

interface Serial0

no ip address

shutdown

!

ip default-gateway 192.168.1.254

no ip classless

ip route 0.0.0.0 0.0.0.0 192.168.1.254

!

!

line con 0

line 1 16

no exec

transport input all

line aux 0

line vty 0 4

logging synchronous

login local

transport input telnet

line vty 5 15

logging synchronous

login local

transport input telnet

!

end
Once that is done you can connect and manage your ‘remote’ switches/routers/firewalls by using the following commands:
telnet 10.10.10.10 2001
Once connected to the device, you can switch between active sessions by using the following command to bring you back to terminal server:
ctrl-shift-6-x
To manage active sessions you can use the following commands:
show line
If one of your lines is stuck in an Active state (*) or you want to log someone else off:
clear line [line_number]
2012
03.16
 I recently shot some video with my new Panasonic HX-DC01 video camera which was a leaving gift from the last company I worked for after 6.5years of loyal service. I was really impressed by the quality of the video, and shot a 15min test clip in 1080p hi definition with all the settings turned up to maximum. Unfortunately when it came time to playback the video on my ancient laptop, my machine was unable to do so smoothly without jumping and skipping in 2 second intervals, the video playback was more like a slide slow.
I decided to play around with some codecs to see if I could get the video to playback smoothly on my aging machine and by encoding the video into divx format. The result was that I was able to get my video to playback flawlessly whilst maintaining the 1080p hi definition and at the same time also reducing my filesize from 1.7GB for a 15min clip down to 432MB, a ~75% file size reduction!
Below is the command I used to do the encoding and also a for loop command in case you’d like to bulk encode an entire directory in one go.
ffmpeg -i /home/user/filename.MP4 -s hd1080 -b 4000k -ab 160k -vtag DIVX /home/user/output_in_divx_format.avi"
for i in *.MP4; do ffmpeg -i "$i" -s 640x360 -b 4000k -ab 160k -vtag DIVX "/home/user/Videos/${i%.MP4}.avi"; done
PANASONIC HX-DC01 MANUAL
2012
03.16
Category:
Linux /
Tags: no tag /
RIPsudo dd if=/dev/cdrom of=/home/user/cd.iso
MOUNTsudo mount -o loop /home/user/cd.iso /mnt/
2011
12.30
watch --differences --interval 3 'df; ls -FlAt;'
2011
12.18
Category:
Linux /
Tags: no tag /
LINUX
Create a new NTFS (type 7 in linux) partition and set it as bootable. Then simply copy the contents of your Windows 2008 iso to the drive and create a Windows compatible MBR on the USB boot drive.
# cfdisk /dev/sdx

# mkfs.ntfs -f /dev/sdx1

# mount -o loop win2008.iso /mnt/iso

# mount /dev/sdx1 /mnt/usb

# cp -r /mnt/iso/* /mnt/usb/

# lilo -M  /dev/sdx mbr
WINDOWS
The windows instructions I copied from the following website http://bramp.net/blog/create-bootable-windows-server-2008-usb-stick I had a look at these instructions first before I was able to replicate the process under linux and produce the instructions above. I have included the windows instructions here for completeness.
Select the USB device from the list and substitute the disk number below when necessary. In this example Y:\ is my mounted image or physical DVD and X:\ is my USB device
C:\> diskpart

DISKPART> list disk

DISKPART> select disk x

DISKPART> clean

DISKPART> create partition primary

DISKPART> select partition x

DISKPART> active

DISKPART> format fs=fat32

DISKPART> assign

DISKPART> exit

C:\> xcopy Y:\*.* /s/e/f X:\
2011
12.17
Category:
Cisco /
Tags: no tag /
By design routers do not forward broadcast packets for a number of reasons but instead create seperate broadcast domains, but what if you do want to forward certain broadcast packets between different vlans or physical networks?
I rely on a lot of different remote management tools to administer the servers in my loft remotely. One of these tools is remote Wake-on-LAN. In order to forward WoL packets between networks you can use the ip-helper address command on Cisco routers.
On the Router where the Wol packets will originate from, we tell the router to allow forwarding of udp packets on port 9. (This is the discard port that WoL packets use.) Then under the interface where the WoL packets will originate from, we tell the router where to forward the packets to.
R1(config)# ip forward-protocol udp 9

R1(config-if)# ip helper-address 192.168.1.255
Now all we need to do is create an access list on the other router to allow the forwarded broadcast messages, otherwise you could open yourself up to a possible Smurf DOS attack. Then we tell the router on which interfaces we will allow the forwaded broadcast messages to be received on.
R2(config)# access-list 101 permit udp 192.168.0.0 0.0.0.255 192.168.1.0 0.0.0.255 eq 9

R2(config-if)# ip directed-broadcast 101
2011
12.17
Well, this year Christmas has come early for me, I recently bought a new server from ebay which I have just gotten around to racking up in the homecomputerlab today.
It’s another ITX form factor server based on the VIA-EPIA chipset which I am now well familiar with. This particular model however, is the VIA-EPIA PD Series which comes with 2x FastEthernet NIC’s and 4x Serial COM ports which when combined with its low noise and low power consumtion, makes it the perfect platform to deploy as an opensource firewall/proxy/content filter server as well as a console server for my Cisco Lab.
I have played with both pfSense and Untangle as virtual machines in a sandbox environment in the past, but I am looking forward to seeing how they perform on the VIA-EPIA baremetal hardware and also in a real world environment. Something else that I’ve had a look into and would be interested in playing with is a dual vendor Firewall DMZ, but that will have to come later, baby steps first :)


VIA EPIA PD Manual
2011
12.08
Windows:
schtasks /create /tn "Reboot" /tr "shutdown /r /t 1" /sc once /st HH:MM:ss /sd dd/mm/yyyy /ru "System"
Linux:
sudo shutdown -r HH:MM
2011
12.08
sed -i 's/old-word/new-word/g' /home/user/docs/*


 I recently shot some video with my new Panasonic HX-DC01 video camera which was a leaving gift from the last company I worked for after 6.5years of loyal service. I was really impressed by the quality of the video, and shot a 15min test clip in 1080p hi definition with all the settings turned up to maximum. Unfortunately when it came time to playback the video on my ancient laptop, my machine was unable to do so smoothly without jumping and skipping in 2 second intervals, the video playback was more like a slide slow.
